If you would like to grant access for other people to view and/or help manage your project, you can do so by using the "Invite Contacts" feature found on the project page. Often times during the plan review process this can be especially helpful because you can grant permission for the architect and engineer to respond to the appropriate comments and upload their revised documents on your behalf. The permission system allows you to determine who can view your projects and what actions they can perform on each of those projects that they have access to. To invite a contact or group of contacts first navigate to the project that you wish to invite them to, then click the " Invite Contacts" button found at the top right corner of the page. If you do not see the "
 Invite Contacts" button, you do not have permission to invite users to this project. If you feel that this is in error, you should contact the project owner and ask to be granted permission to invite contacts.
After clicking "Invite Contacts" you should see the following screen:
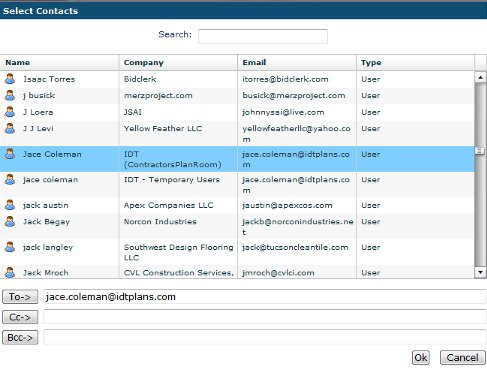
If the user(s) that you wish to invite are already registered in the system, you can click the "To" button to select those users or groups of users from a list of existing system users and groups. You can use the search field to search for a user by name, company, or email. When you find the user that you're looking for, click the name of that user to highlight that row in blue, then click the "To ->" button at the bottom of the page to add them to the list. Repeat this process for each user that you wish to add, then click the "OK" button at the bottom of the page. Adding users to the "Cc ->" section will copy them on the email that is sent out but will not grant them permission, others will be able to see that they were copied on the email. Adding users to the "Bcc ->" section will copy them on the email but not grant them permission, others will NOT be able to see that they were copied on the email.
If you would like to add an attachment to the email you may do so by clicking the "
 Attachments" icon. In the File Location field, select "Local" if the file that you wish to attach is located on your computer, select "Remote" if the file is already located within the project. Follow the on screen instructions to complete the file attachment process.
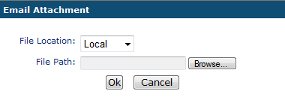
Press "Submit" to complete the invitation process. This will send an email to each user that you've selected and will grant the permission template that you selected to everyone in the "To..." field.
Was this article helpful?
That’s Great!
Thank you for your feedback
Sorry! We couldn't be helpful
Thank you for your feedback
Feedback sent
We appreciate your effort and will try to fix the article